I did it. I participated in another Instagram Builders Challenge and wow was that fun. With a lot of unexpected things happening this past week though, my shop time was quite limited so I was a little concerned I wouldn't complete the build on time! Happy to say I did and managed to submit all my photos this afternoon (deadline is tomorrow!!) I'm just going to take a quick breather but will be back soon with all the details. :) Here's a quick pic of me and my finished build though! ;)
Promise I'll be back soon!!!
Cristina
Showing posts with label hardware. Show all posts
Saturday, April 15, 2017
Thursday, February 23, 2017
Hidden Storage Cabinet
Hi guys!
I'm so excited to share this recent project I just finished. If you've been following me on Facebook or Instagram you will have already been seeing a few sneak peeks of the progress. If not, I'm so glad you're here to see it now!
I had a lot of leftover pine in my shop after a few past projects (I tend to overbuy so I don't run out) and thought this would be a great way to use some of it up. I'm a huge fan of chalkboards and after building my daughter a HUGE chalkboard for Christmas, (I guess I should blog about that project too!) I had a lot of chalkboard paint leftover as well, so thought I'd add that to mix. ;)
So this is the final result. How cute is this?! It would be great in a kitchen, hall, or really anywhere in the house.
A simple little drawer on the bottom is a great spot to hide the chalk!
What makes this cabinet really unique though is that it's actually got HIDDEN storage! Ready for this?
I had a lot of fun building this piece and anticipate I'll be building a few more in my future.
Thanks for popping by!
Cristina
I'm so excited to share this recent project I just finished. If you've been following me on Facebook or Instagram you will have already been seeing a few sneak peeks of the progress. If not, I'm so glad you're here to see it now!
I had a lot of leftover pine in my shop after a few past projects (I tend to overbuy so I don't run out) and thought this would be a great way to use some of it up. I'm a huge fan of chalkboards and after building my daughter a HUGE chalkboard for Christmas, (I guess I should blog about that project too!) I had a lot of chalkboard paint leftover as well, so thought I'd add that to mix. ;)
So this is the final result. How cute is this?! It would be great in a kitchen, hall, or really anywhere in the house.
A simple little drawer on the bottom is a great spot to hide the chalk!
What makes this cabinet really unique though is that it's actually got HIDDEN storage! Ready for this?
How awesome is that?! The perfect spot to tuck away any extra house keys, jewelry or other small items you'd like to keep out of sight.
I've posted a quick video of how it works.
And I just had another thought! If you're like me with a growing Essential Oils collection, how awesome would it be to modify the slide out a little and store all your oils in it!
I had a lot of fun building this piece and anticipate I'll be building a few more in my future.
Thanks for popping by!
Cristina
Sunday, July 24, 2016
#IGBuilders Challenge
Hi guys! If you've been following me on facebook, then this is old news, but if not, I'm very excited to share this with you! A few weeks ago I decided to sign up for a building challenge.
When I signed up, I had no idea what we would actually be asked to build. After the signup deadline had passed, all builders were sent a set of plans for a simple console table. We were given instructions to build it, make a few minor modifications if we wanted (as long as the finished piece still resembled the plan), and paint/stain/complete it...all within 3 weeks! Normally this would have been a simple feat for me and I wouldn't have thought much of it, but with my kids home from school for the summer, I knew my shop time was going to be drastically reduced and I wasn't sure I would meet the 3 week deadline. BUT, I decided to go for it anyway. ;)
This is a picture of the original plan...
As soon as I saw it, I knew what i wanted to do! :) I redrew the plan in sketchup but with the modifications I had in mind to make sure it would still "look right". My modifications included 2 additional legs in the front so I could divide it into 3 sections for drawers and made it two thinner drawers instead of one deeper one. I also narrowed it down a few inches so I would only have to purchase 8' boards instead of 12' - they're easier to transport in my van - haha! ;) I also added the bottom shelf and the X's to the sides to match our coffee table I built last month. I loved it (and hoped the judges would too!)
I purchased a mix of fir, knotty pine and pine plywood and got to work!
I started by building the main frame.
From there I built and added the drawers.
This is actually just a test fit to make sure they were all fitting perfectly before I installed all the drawer slides. :)
For the top I ran all my lumber through my thickness planer to make sure they were all the same thickness and then glued them up to make a larger solid piece rather than use a plywood or other type of sheet material. One of the things in the original plan that I liked the look of was the breadboard ends. Rather that just using pocket holes and screws, I decided to attempt a more traditional method called tongue and groove. I've definitely got to work on it a bit more, but I was happy with the result...even if it's not 100% accurate. ;)
Drawers installed and breadboard ends attached!
I chose to do a stained top and painted bottom. The colour I chose for paint is called "Ashwood" by Benjamin Moore. I had the colour matched at Home Depot in a satin finish in their Behr Premium Plus paint line. I sprayed on at least 4 coats, lightly distressed all the edges (because I know my kids will naturally add to that over time!) and then followed it with a satin polycrylic clear coat.
The top is stained in Minwax Jacobean and finished with a satin wipe-on poly.
To install the drawer fronts, one of the other builders in the challenge shared a tip she had learned - and it is brilliant! By using a deck (or 3) of playing cards as shims, it allows easy adjustments to space the drawer fronts perfectly!
I always drill my hardware holes in the drawer fronts first so they're perfectly centered. Then, once shimmed in place, I temporary screw the fronts to the drawer boxes through the predrilled holes. I shoot a few small staples with my nail gun from the inside of the drawer box into the back of the drawer front which holds the front in place when I remove the temporary screws. From there I just run my drill through the previous holes I drilled in the drawer front, through the drawer box, and there you go, perfect placement holes for the hardware!
Speaking of hardware, aren't these gorgeous??? I found them at our local Windsor Plywood and knew they were perfect! I believe it was an "aged bronze" finish.
And, here is my finished table!
I am SO thrilled with how my table turned out and it fits in perfectly in our home! Now, this was a building challenge and there could only be one winner. Definitely head over to Instagram and check out #IGBuilderschallenge and see the other builders gorgeous builds! As soon as the tables started being posted, I had NO idea how the judges would ever make a decision! SOOO tough!
With over 200 builders signed up and SO many gorgeous tables built, I never actually thought I would ever win....well, I was completely shocked and overjoyed when I received a message saying that the judges had picked MY table as the winner!!!
I couldn't believe it...and was a little more than excited. ;) Lets just say our neighbors thought we'd won the lottery the way I was freaking out on our back deck! ;) Hey, I felt like I had!!
Anyway, now that the challenge is done, I'm sitting back for a little breather before working on the next project. ;) Well...maybe....
Thanks for popping by!
Cristina
When I signed up, I had no idea what we would actually be asked to build. After the signup deadline had passed, all builders were sent a set of plans for a simple console table. We were given instructions to build it, make a few minor modifications if we wanted (as long as the finished piece still resembled the plan), and paint/stain/complete it...all within 3 weeks! Normally this would have been a simple feat for me and I wouldn't have thought much of it, but with my kids home from school for the summer, I knew my shop time was going to be drastically reduced and I wasn't sure I would meet the 3 week deadline. BUT, I decided to go for it anyway. ;)
This is a picture of the original plan...
As soon as I saw it, I knew what i wanted to do! :) I redrew the plan in sketchup but with the modifications I had in mind to make sure it would still "look right". My modifications included 2 additional legs in the front so I could divide it into 3 sections for drawers and made it two thinner drawers instead of one deeper one. I also narrowed it down a few inches so I would only have to purchase 8' boards instead of 12' - they're easier to transport in my van - haha! ;) I also added the bottom shelf and the X's to the sides to match our coffee table I built last month. I loved it (and hoped the judges would too!)
I purchased a mix of fir, knotty pine and pine plywood and got to work!
I started by building the main frame.
From there I built and added the drawers.
This is actually just a test fit to make sure they were all fitting perfectly before I installed all the drawer slides. :)
For the top I ran all my lumber through my thickness planer to make sure they were all the same thickness and then glued them up to make a larger solid piece rather than use a plywood or other type of sheet material. One of the things in the original plan that I liked the look of was the breadboard ends. Rather that just using pocket holes and screws, I decided to attempt a more traditional method called tongue and groove. I've definitely got to work on it a bit more, but I was happy with the result...even if it's not 100% accurate. ;)
Drawers installed and breadboard ends attached!
I chose to do a stained top and painted bottom. The colour I chose for paint is called "Ashwood" by Benjamin Moore. I had the colour matched at Home Depot in a satin finish in their Behr Premium Plus paint line. I sprayed on at least 4 coats, lightly distressed all the edges (because I know my kids will naturally add to that over time!) and then followed it with a satin polycrylic clear coat.
The top is stained in Minwax Jacobean and finished with a satin wipe-on poly.
To install the drawer fronts, one of the other builders in the challenge shared a tip she had learned - and it is brilliant! By using a deck (or 3) of playing cards as shims, it allows easy adjustments to space the drawer fronts perfectly!
I always drill my hardware holes in the drawer fronts first so they're perfectly centered. Then, once shimmed in place, I temporary screw the fronts to the drawer boxes through the predrilled holes. I shoot a few small staples with my nail gun from the inside of the drawer box into the back of the drawer front which holds the front in place when I remove the temporary screws. From there I just run my drill through the previous holes I drilled in the drawer front, through the drawer box, and there you go, perfect placement holes for the hardware!
Speaking of hardware, aren't these gorgeous??? I found them at our local Windsor Plywood and knew they were perfect! I believe it was an "aged bronze" finish.
And, here is my finished table!
I am SO thrilled with how my table turned out and it fits in perfectly in our home! Now, this was a building challenge and there could only be one winner. Definitely head over to Instagram and check out #IGBuilderschallenge and see the other builders gorgeous builds! As soon as the tables started being posted, I had NO idea how the judges would ever make a decision! SOOO tough!
With over 200 builders signed up and SO many gorgeous tables built, I never actually thought I would ever win....well, I was completely shocked and overjoyed when I received a message saying that the judges had picked MY table as the winner!!!
I couldn't believe it...and was a little more than excited. ;) Lets just say our neighbors thought we'd won the lottery the way I was freaking out on our back deck! ;) Hey, I felt like I had!!
Anyway, now that the challenge is done, I'm sitting back for a little breather before working on the next project. ;) Well...maybe....
Thanks for popping by!
Cristina
Wednesday, October 14, 2015
My Juliet Nightstand
This sweet little nightstand is the perfect addition to any
room. Inspired by the Juliette
Nightstand from Pottery Barn Kids, I wanted to create it using some leftover
materials I had from previous projects.
The top, sides and shelf were constructed from mdf. The legs were cut from a spruce 2x4 that I
ripped down on my table saw to a square 1.5" x 1.5" post. The adorable little curvy “feet” are actually
from a pine stair baluster! I chopped it
down into pieces and by drilling a small hole in the top of the “foot” and the
bottom of the table leg, I was able to glue them in place with no worry of them
moving around.
The drawer interior was built from 3/8” plywood. I cut a dado groove along the bottom for a 1/4"
plywood base to fit in. The drawer was
then installed with simple white drawer glides.
The adjustable lower shelf sits on simple chrome shelf pins so it’s
quick and easy to adjust.
The soft white paint colour and clear coat in a satin finish
was perfect for the table. And of course
the glass drawer pull was the finishing touch!
This lovely little table has been sold.
Thanks for popping by!
Monday, July 27, 2015
Dresser & China Cabinet
Hello, hello!!!
I realize it’s been AGES since I’ve posted anything, but although
things have been quiet on my blog, I have actually been working away. Of course, with my kids on summer
holidays my painting tends to take a back seat, but I’ve been sneaking out to
paint when I have the opportunity. If
you’ve popped over to visit my facebook page you will have already seen these,
but I thought I should share them here as well.
A couple of the projects I worked on and completed.
I actually agreed to purchase this dresser after only seeing a picture online. I was drawn to the unique carved design on the front and the lion-head drawer pulls on the top drawers.
I painted the top a dark espresso with a glossy clear coat. The bottom was painted white followed with a dark glaze to really draw out the details of the dresser. The original hardware was updated in an oil rubbed bronze colour.
This next big project was this china cabinet. I'd had it sitting waiting its turn for too long and it was high time it was refinished!
I stripped the paint off the top of the bottom portion and stained it a darker colour followed by a glossy poly.
The remainder of the cabinet was painted a light grey and then also followed with a darker glaze. I replaced all the old/damaged hardware with new brushed nickel and removed the dated glass and added a simple hardware cloth. The original back panel was damaged so I also replaced that with a brand new piece.
Both pieces have been sold.
Thanks for popping by!
Sunday, May 17, 2015
Reclaimed Beauty
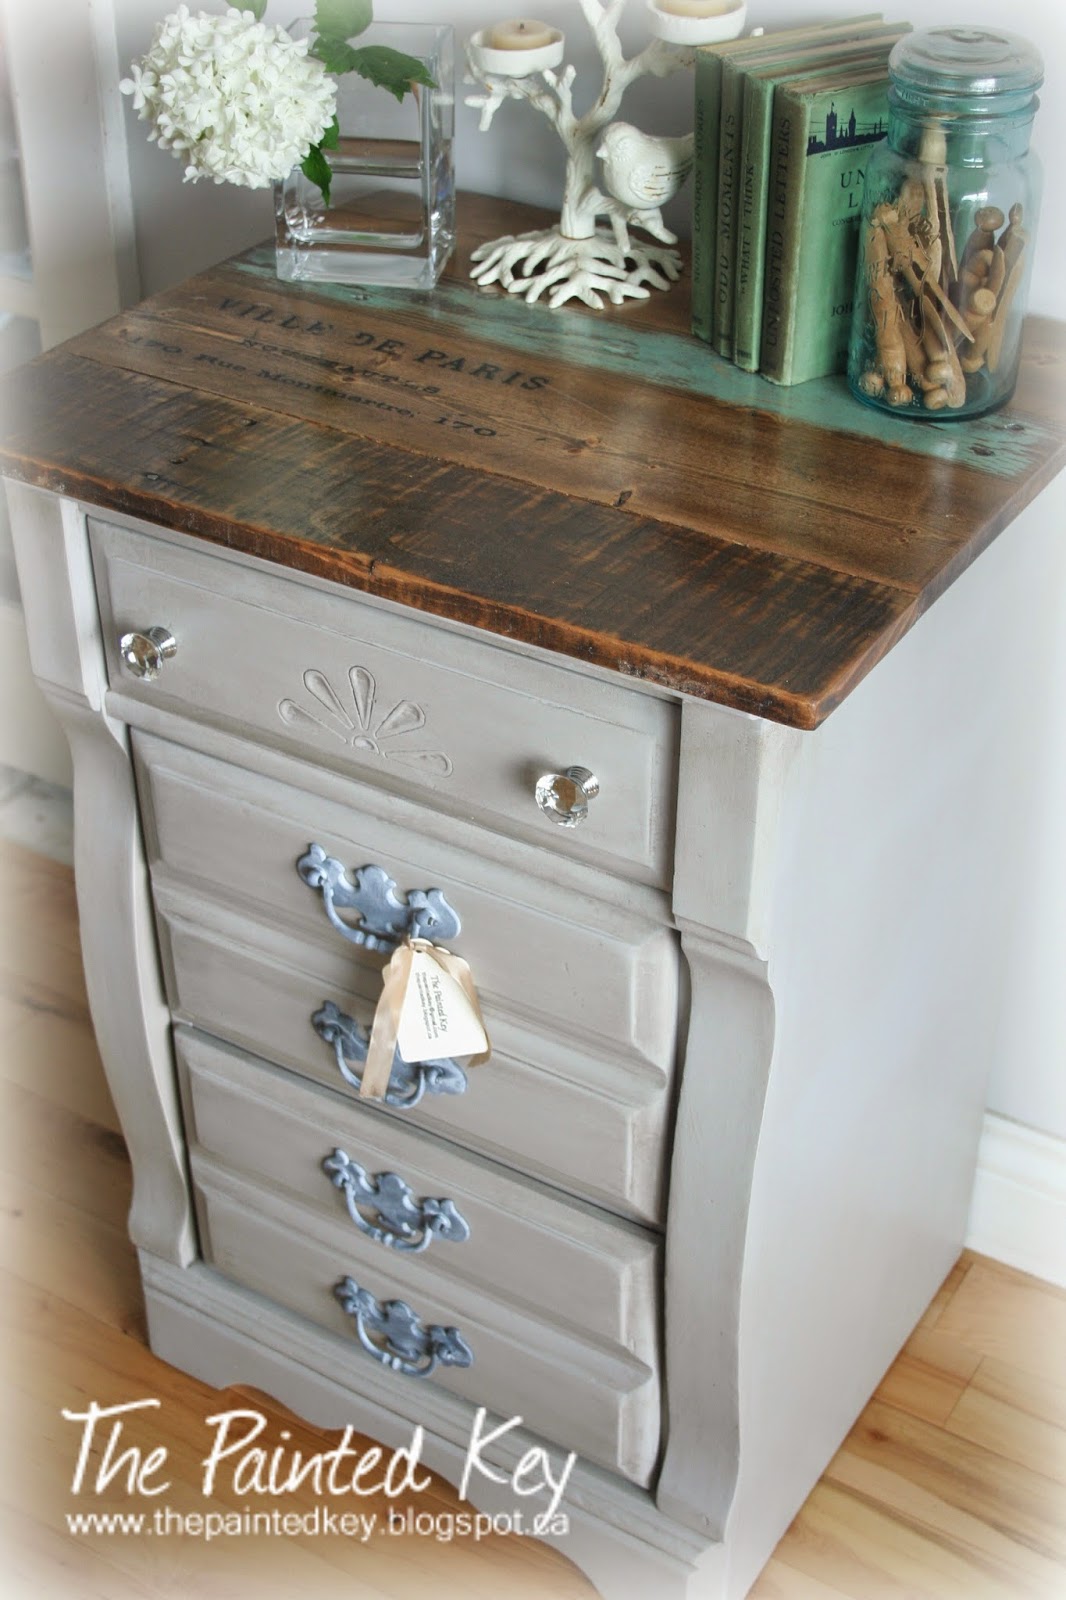
I picked up this piece as part of a set last year which also
included a dresser and pair of side tables.
I refinished all but this one. I wasn’t actually sure what to do with
it! It was an odd piece. The base was square, but the top had a sort
of triangular top that just seemed awkward. I actually forgot to take a "before" picture, so this is the one I originally pulled from the sellers ad.
Because I’m on a mission to clear out my workshop and
actually give myself more room to work, I knew this piece had to be finished
sooner than later. The top was long gone
(I got rid of it shortly after I got the piece home) but debated what tdo
replace it with. I finally decided I
would use reclaimed lumber. Sadly, once
I actually started piecing it together, I realized the lumber I had wasn’t going
to work the way I wanted and really only had one good piece to use. I decided to work with it and just used a
couple new pieces of lumber as well which I distressed before staining. I also added a simple French inspired transfer
before finishing it all off with a glossy poly.
I started with a
light grey on the base and decided to add a dark glaze to give it a
little depth. I also tried a new clear
coat product suggested by my local Benjamin Moore retailer. It’s a water based clear varnish but in a
“dead flat” finish. I love the way it
looks! It has a subtle sheen which I
find gives the look of a waxed finish. I
likely won’t use it on all my pieces as I still love the modern look of a
glossy piece of furniture, but for a slightly more vintage look I wouldn’t
hesitate to use this finish again.
I chose to use the original hardware on the bottom
drawers. They were originally a dated
brass look and so after a few different paint colors, the updated finished look
reminds me of aged zinc. A pair of glass drawer pulls on the top add just a little sparkle.
While I normally line the drawer interiors with a vinyl, I
chose to leave these as is. The original
vintage-.look paper already in them just finish off the piece perfectly.
I’m so happy with the finished piece. I honestly didn’t have much of a plan when I
started on it and just let it develop as I went along.
If you would like to add this piece to your home, please let
me know. Now available in my shop.
Subscribe to:
Posts (Atom)