Thursday, May 16, 2013

Mirror mirror on the wall....almost.


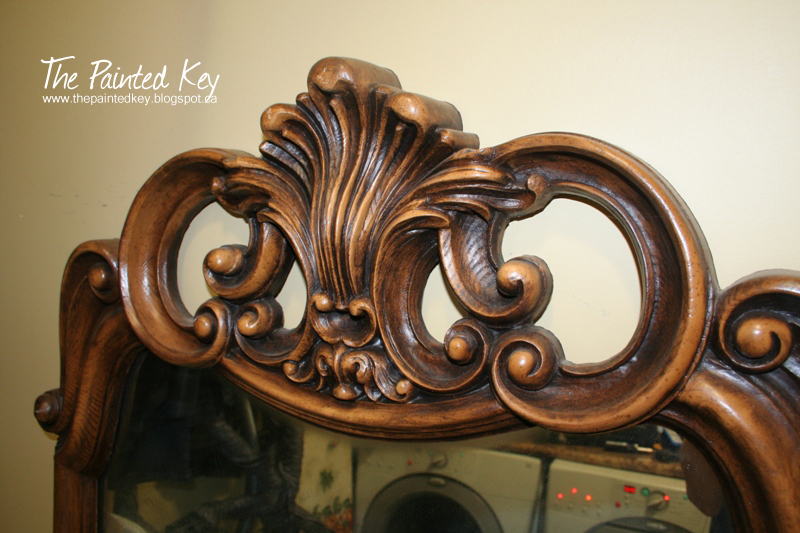
I picked up this old dresser mirror last summer, loving the look of the top, with the plan to refinish it and convert it to a wall hanging mirror.   


I was a little disappointed when I went to see it and realized it wasn’t wood at all, but some sort of thick plastic with a hollow back.   


I knew I could still paint it, but I wasn’t sure if I could hang it on the wall.  I decided to buy it anyway and when I got home, propped it against the wall on our front deck.  And there it sat...and sat...and sat a little more.   After a few months letting it sit on our front deck for longer than it should have, I decided it was time to try SOMETHING with it, so I mixed up another batch of DIY chalk paint.  


 I love the soft blue/green color.  It’s the same color I used on this little chair I recently refinished.  After the paint, I dry brushed on a little bit of gold paint for some added color.

To seal it, I decided to try a new soft clear wax.  While I loved the look of the subtle sheen the wax left, I think I may stick to spraying on my finishes...so much easier on my hands and arms. ;) 

The original “legs” that would have attached it to the dresser had to be removed.  Because the frame is only plastic and the backing material is a thin pressboard-type material, there was nothing for me to attach any sort of heavy duty hanging system to.  So, for now I’ve got it propped up on our tile tub surround in our master bathroom.  I’d still like to attempt to come up with a way to hang it on the wall, but for now, I’m happy with it just leaning.


 I think the soft gold dry brushing works perfectly with the artwork on the wall.


Now, before you start questioning my sanity and wonder why in the world I would think of placing such a large mirror next to a bathtub, let me explain. ;)  Other than a small skylight, our ensuite doesn’t have any windows.  Mirrors are a great way to make a small space feel more spacious and reflect light to make a space brighter.  With the door on the opposite wall, the mirror helps to reflect the light that comes in from the bedroom window.

So there you go...an old and dated dresser mirror has been given a new lease on life and is the perfect addition in our bathroom.

 
Thanks for stopping by!


Monday, May 6, 2013

DIY Campout (Pottery Barn hack)


Here’s another DIY build I just finished.   


Our youngest son has been needing a bedside table since, well, he’s never had one, so forever!  Just for fun I decided to check out the Pottery Barn Kids furniture line.  I loved the look of their Camp Nightstand, but at $318 PER TABLE, I knew this would be another DIY project in the making.

Using the Pottery Barn table as my inspiration, I built a custom size one to fit our sons room.  Using my Kreg Jig to drill the pocket holes made assembly fairly quick and simple.  I glued/nailed some thin trim on the sides to match the inspiration pic.


Because he has a natural color wood bed in his room, I chose to build a wood top, routered a decorative profile along the edge and stained it to match.  I took the following picture at night and the flash is making the color look too red. I used the same router bit along the edge of the drawer front as well.


The rest of the table got a coat of primer, a couple coats of a custom mix blue latex and then a couple clear coats.   


I had an extra drawer pull in the garage and I think it works well on this side table.


I know this table will work perfectly in his room for his little clock, a small lamp and a few books.


And, another project complete!  

Thanks for popping by!


Saturday, April 27, 2013

Shabby to Chic


Another French Provincial project!  I picked up this desk along with these side tables a couple of years ago.  

 
I think they were actually a few of the very first pieces of furniture I bought when I decided to start painting –  so, I’ve probably had them at least 3.5 years (but who’s counting) and planned to refinish them for our daughter's room.  At that time I’d done a little research on painting, but wasn’t aware of the necessity of adding a protective coat over the paint.  I think after the primer, I actually painted the desk in an eggshell latex paint and left it at that!  The desk sat in my daughters room for probably 2 years and was sadly looking pretty shabby...and not in a chic way!  I finally decided to drag it back down to the garage and refinish it properly!  

The desk didn’t come with a chair, but I had a small one tucked away that I knew would work well with it.  I lovingly refer to it as my “painting chair” because I would sit on it when I used to paint my furniture by hand.  


Now that I’ve upgraded to a paint sprayer, the chair wasn’t necessary anymore.  I’d painted it last year with a DIY chalk paint in a deep red to use as part of our Fall decor on our front porch.   


I knew it was time to give it another little makeover.  I had some leftover DIY chalk paint from another project and so I decided to use that.  It’s a beautiful soft “green/blue” color.  If you’re familiar with Annie Sloan chalk paint, it’s almost identical to her “Duck Egg” paint color.  You’ll likely be seeing this color a bit more over the next little while – I just love it!  

 
To refinish the desk, I lightly sanded it, sprayed it with a fresh coat of primer, a couple coats of crisp white paint and then a couple clear coats.  


I chose to remove the decorative accents that were originally on the top drawers.  They were plastic and already loose, so they had to go.  I decided to use the original hardware on the bottom drawers but updated them by spraying them with a metal primer and then a couple coats of glossy white.  


The desk was missing one of the original top drawer pulls, so I replaced them all with some pretty glass ones.  


I decided to line the bottom of each drawer with a soft green vinyl sheet to freshen them up and make them pretty.


And a few more pic's just because I can.  *wink*


And that pretty pillow?  I picked up some soft linen-like fabric last night and whipped up the pillow this morning!  I love the simple look of the single flower.


I added a single "cracked glass-look" bead to the center for a little extra sparkle.


It is now ready for its new home and is listed in my shop.

Thanks for stopping by!

Tuesday, April 9, 2013

French Provincial Desk to Table


I picked up this little table last year and tucked it away until I had some free time to work on it.  This picture is from the original online ad.    

I think it was a corner desk, but it just seemed like such an awkward size that I decided to convert it into a small side table.

I started by tossing the top and then removing the legs and cutting them down a few inches.  I also removed the back (someone had previously cut a portion out of it already) and shortened the sides so it wasn’t quite as long.   

I built a new top the same way I did on this little dresser.  I couldn't trim it out the same way though, but still wanted to add a little something to the edges, so I decided it was time to teach myself how to use our router.  The router has always made me a little nervous, but after reading a number of how-to articles and watching a few YouTube  videos, I knew I could do it.  It was actually a LOT easier than I thought!  I chose to use a Roman Ogee bit for the decorative profile and decided to router the bottom edge instead of the top.  


I finished it with a couple coats of a dark stain followed with a few coats of glossy polyurethane.


I set the top aside and started working on the table base.  After adding a couple new supports to the back and reattaching the shorter legs, it got a coat of primer, a couple coats of soft creamy white paint, some light distressing and was finished with a glossy clear coat.


I had wanted to try something a little different and painted the drawer front with a soft green diy chalk paint.  It didn’t look anything like I’d envisioned though!  SO, I sanded it off, primed it, and painted it the same creamy white as the rest of the table.  To finish it off, I replaced the original hardware with two new glass drawer pulls for a little sparkle.


This little side table is almost ready for a new home and will be available in my shop shortly .

Thanks for stopping by!