Saturday, October 26, 2013

A Little Rescued Relic


Over the summer I went to see this little dresser after a few other people ahead of me decided to pass on it. (Pic is from the original online ad)


As soon as I saw it up close, I realized the problem.  Originally it would have had some cute little curvy legs, but at some point, someone had decided to chop them off!  


I’d like to think it must have been damaged during a move as I can’t seem to understand any other reason why you’d cut off those cutie little legs!  After I pointed out a few of the other issues (the paint was in rough shape and one of the drawer slides was cracked and broken as well), the seller agreed to lower the price and we loaded it into my van.


To add back some height to the dresser, I knew I had to replace the missing legs.  The problem was the only available premade furniture legs I could find locally were not only too big and bulky, but they were expensive!  Four new legs would have cost me almost DOUBLE what I originally paid for the dresser!  After some thought, I decided to make new legs using parts of the leftover wooden stair balusters I had after building my little DIY bedside table.  It worked!  Because the original cuts on the dresser were "off" and didn't leave much to work with, I had a little trouble cutting the legs to the required length so the dresser didn't wobble.  THAT was fun....eek.


After a good sanding, a crisp white paint and glossy clear coat, this beautiful little lady is standing tall again!    


I chose to use the original hardware but sprayed it in a glossy white to update it.  The addition of the black and white vinyl freshens up the inside of the drawers.   


With a new drawer slide and all new corner drawer supports, this lovely little lady will soon be added to my shop and ready to go to a new home!

 Before & After

Thanks for popping by!


Wednesday, October 16, 2013

A Sweet Little Night Table


Another DIY project for the townhouse!  


Partway through the reno, I had an itch to build something, so using some scrap lumber I had on hand, I decided to build a small little night table knowing we could use it for staging the third bedroom.

I cut all my lumber one afternoon and with the nice weather we were having at the time, I was able to spend some time assembling it in the backyard while my kids were playing.


For the top I used a scrap piece of MDF and routered a decorative profile along the edge.


To make assembly quick and easy, I used my Kreg Jig to drill all the pocket holes.  I knew I would want to hide them in the end, so using a 3/8” wooden dowel, I had my boys help me make our own “pocket hole plugs”…with a little glue, they slide into the pocket hole, and then after a small dab of wood filler, can be sanded smooth and painted over!


I wanted some cute little “feet” on the bottom, but wasn’t willing to spend a ton as the rest of the table was built from leftover scraps and I wanted to keep this as close to "free" as possible.  I went to one of our local lumber yards and picked up two wood stair balusters.  I cut off the portion I wanted, added some wooden dowel and was able to use that to attach it to the side table.  Perfect!  


After a coat of primer, some glossy paint and a single glass drawer pull for some sparkle, the table was completed and was perfect for the townhouse!  


Once the townhouse sells, I haven't decided if I'll be listing this one or keeping it for my daughter. ;)

Thanks for visiting!


Monday, October 14, 2013

My Kentwood Bookshelf


I’m back!!!!  After 3-1/2 months of renovation work, I’m thrilled to say the work on the townhouse is FINISHED!  I’ll need a little time to sort through all the photos and get them organized, but I can’t wait to share the big reveal with you.  I’m still amazed at the changes!

While working on this reno, I pretty much put all my personal projects on hold (hence the lack of posts the past few months).  I did manage to work on a couple DIY projects though as we got to the end of the reno and closer to the staging process.   

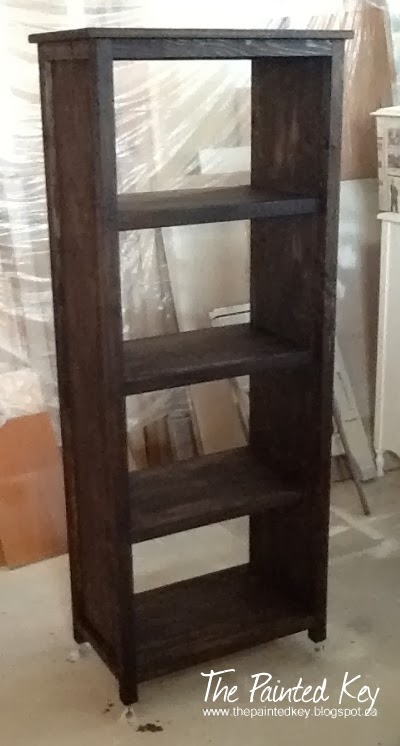
One of them included a bookshelf for the living room.  With the furniture going in, we were left with a “blank wall” that I felt needed to be filled up and decided I could build something.   I chose to use Ana White’s plan for her Kentwood bookshelf.  While my hubby had a couple guys over to watch hockey one evening, I spent a few hours in the garage cutting, drilling & assembling a bookshelf. 


I changed the plan a little and built it from ¾” sanded pine plywood that I had cut into 11-1/4” panels at the store and used SPF white wood for the “legs” and shelf edges.


While I normally go with a lighter chestnut color stain, I decided to try a darker color and choose Minwax Jacobean.  Wow – definitely darker than I was used to and a little scary applying to the white pine! 


Little side note - have you seen these amazing little painters triangles?  Placed under your project, they prop it up away from the floor or table surface and make painting or staining a piece SO much easier!!!


ANYWAY....because we were in a bit of a time crunch, I chose to only apply a single coat of stain and a single coat of wipe-on poly.  I’ll likely add a few additional coats of poly later on, but for now the bookshelf is the perfect piece to fill up that blank wall space.


Thanks for popping by!


Sunday, September 22, 2013

It's only been 3 years...


SO excited to share another before and after project I finally finished!   


This poor chair was started a LONG time ago (ahem, 2010) and then left in our garage waiting for me to find just the right fabric to cover it with. 

When I originally purchased the chair, it had been poorly painted with a glossy black paint.  The fabric it had been covered in was definitely not what I would have chosen.  I wish I’d taken a picture of the original fabric on the back.  It was pretty hideous and didn't match the front at all!


I decided to paint the chair a glossy white and lightly distressed it to allow a little of the original black to show through.  The seat and front side of the back rest were only held on with a couple screws and some staples, so they were easy to remove.  After removing the old fabric, I was able to easily wrap my new fabric around the pieces and staple them in place.  I forgot to take pictures of this part!  Oops!  The front and back of the back rest were two separate pieces.  After attaching the front piece, I decided to add two button tufts for a little subtle detail.   


I used the same buttons I used on our upholstered headboard so I could cover them in the matching fabric.  After drilling a hole through the wood backing, I threaded a long upholstery needle with a piece of soft nylon drapery cord.  I pushed the needle through the chair, threaded on a button and then pushed the needle back through to the back.   


Before tying a knot, I added a small metal washer on one piece of the cord.   


This prevents the knot from slipping through to the front of the chair and helps to cinch up the cording while I’m tying the knot….or eight.   


Hey…I wanted to make sure that cording wasn’t going anywhere!!!

Because the backing is only a thin ¼” thick piece of wood covered in a very thin foam, I used my heavy duty stapler to reattach it to the chair.   


I knew I would have to cover up the staples, so I decided to try my hand at sewing some double welt cording.    It was so simple to make!  After cutting my fabric on the bias (important if you want your fabric to lie smoothly around the corners!), I wrapped it around TWO pieces of cording, both cut long enough to go around the entire back of the chair.  With my zipper foot in place, I sewed the fabric, enclosing the cords inside. 


After sewing, I shifted the cording a bit with my fingers so the seam was closer to the center of the two cords rather than along one edge.  I hope that makes sense – again, I forgot to take a picture.  Once that was done, I switched over to my regular sewing foot and carefully stitched down the center along the front between the cords.  


I trimmed the excess fabric off close to the stitching along the back and then actually used my hot glue gun to attach it to the chair!


I had originally planned to only apply the double welting along the back, but when I held it up along the front of the chair, I knew it had to go there too!  It just finished it off so nicely!


I’m happy with the way this chair turned out.  So much lighter and cleaner looking than the before.   I’ll likely list the chair for sale at some point, but for now it’s being used for staging at the townhouse.


Thanks for visiting!