Showing posts with label desk. Show all posts

Saturday, June 8, 2013

Sugar and Spice


It’s another desk makeover!  This is the last desk for awhile...at least, I don’t think I have another one buried in my garage right now.

I picked up this cutie last summer and finally dragged it into my garage to work on it. I forgot to take a full before pic, so I contacted the seller I’d purchased it from and she gave me permission to use the original picture she’d sent me.  


It was solid, but needed a bit of a face lift.   


The paint along the top had started to lift and chip away so I decided to spend the time stripping it down with the intention to stain it.  I just love the look of a two-tone piece!  


After spending a fair amount of time stripping away all the paint, I was disappointed to find the wood had some serious discoloration.   


I’m not sure if it had been painted over that way, or if something had somehow gotten under the paint.  After some serious sanding, I was happy to find it was just surface staining and I could continue with my idea of staining it.  I chose to use my favorite chestnut color, English Chestnut by Minwax.  I love the rich deep color.    

First coat
 

Second coat

 After two coats of stain, I finished it with five coats of glossy polyurethane.  

To update the look of the hutch, I chose to remove the two doors.  I found the design slightly odd with the open shelf above them.   


Both the hutch and the body of the desk received coats of primer, crisp white paint and were followed with a glossy clear coat.

I decided I wanted to try something different than my usual “paint everything white” treatment like so many of my furniture pieces usually do.  My inspiration was this gorgeous buffet refinished by Marian, aka Miss Mustard Seed.   


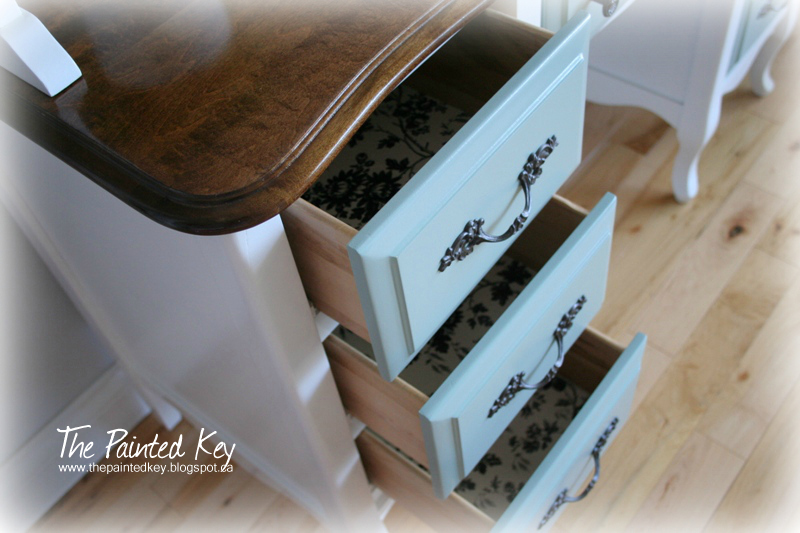
I chose to paint the desk drawers in the same soft blue/green color I used on this little desk chair makeover.  The original hardware was updated with oil rubbed bronze paint.


I'm such a sucker for furniture with curvy little legs!!!


I thought it was only fair to freshen up the inside of the drawers as well with a simple black and white vinyl.


I left the very back of the hutch until last.  I debated whether to just paint it white, the same blue/green as the drawers, or to go with something completely different and add some colorful fabric.  The fabric choice won.  I had this beautiful piece in my fabric stash and it worked perfectly with the painted drawers.   


I cut a new ¼” plywood backing and adhered the fabric.  Once the edges were trimmed, it was attached to the back of the hutch.


I am absolutely thrilled with the way this makeover turned out.  I knew I was taking a chance straying from my usual solid white paint, but I felt this desk could handle it.  I love the way the fabric picks up on the white and blue/green paint colors as well as the glossy wood top.


This beauty will soon available in my shop and ready for a new home.

Thanks for stopping by!


Saturday, April 27, 2013

Shabby to Chic


Another French Provincial project!  I picked up this desk along with these side tables a couple of years ago.  

 
I think they were actually a few of the very first pieces of furniture I bought when I decided to start painting –  so, I’ve probably had them at least 3.5 years (but who’s counting) and planned to refinish them for our daughter's room.  At that time I’d done a little research on painting, but wasn’t aware of the necessity of adding a protective coat over the paint.  I think after the primer, I actually painted the desk in an eggshell latex paint and left it at that!  The desk sat in my daughters room for probably 2 years and was sadly looking pretty shabby...and not in a chic way!  I finally decided to drag it back down to the garage and refinish it properly!  

The desk didn’t come with a chair, but I had a small one tucked away that I knew would work well with it.  I lovingly refer to it as my “painting chair” because I would sit on it when I used to paint my furniture by hand.  


Now that I’ve upgraded to a paint sprayer, the chair wasn’t necessary anymore.  I’d painted it last year with a DIY chalk paint in a deep red to use as part of our Fall decor on our front porch.   


I knew it was time to give it another little makeover.  I had some leftover DIY chalk paint from another project and so I decided to use that.  It’s a beautiful soft “green/blue” color.  If you’re familiar with Annie Sloan chalk paint, it’s almost identical to her “Duck Egg” paint color.  You’ll likely be seeing this color a bit more over the next little while – I just love it!  

 
To refinish the desk, I lightly sanded it, sprayed it with a fresh coat of primer, a couple coats of crisp white paint and then a couple clear coats.  


I chose to remove the decorative accents that were originally on the top drawers.  They were plastic and already loose, so they had to go.  I decided to use the original hardware on the bottom drawers but updated them by spraying them with a metal primer and then a couple coats of glossy white.  


The desk was missing one of the original top drawer pulls, so I replaced them all with some pretty glass ones.  


I decided to line the bottom of each drawer with a soft green vinyl sheet to freshen them up and make them pretty.


And a few more pic's just because I can.  *wink*


And that pretty pillow?  I picked up some soft linen-like fabric last night and whipped up the pillow this morning!  I love the simple look of the single flower.


I added a single "cracked glass-look" bead to the center for a little extra sparkle.


It is now ready for its new home and is listed in my shop.

Thanks for stopping by!

Saturday, November 3, 2012

Frumpy to French Country


I love the way this sofa table turned out.  LOVE it!  This particular table was part of a package deal of furniture I bought a few weeks ago.   When I first saw it, I knew I wanted to paint the bottom and stain the top.  I find a two tone finish on furniture so rich and warm.  

(Click the pics for a closer peek)


The lovely brass "hinges" were only decorative and I managed to pop them off easily with a screwdriver!

I started sanding off the finish along the top and quickly realized that it was not real wood, but a manufactured wood product.  Staining that wasn’t going to work.  My next thought was to just paint the top a warm rich brown instead. 


Oh my...it looked terrible.  I wasn’t sure if it was the paint (it was a new color I was trying), the dated oval top or the combination of both, but I hated it!  I removed the top and set it aside so I could start on the base of the table.  

After a couple coats of primer,  I sprayed on a few coats of a soft creamy white.  Oops...I forgot to take pictures at this point.  It has to be one of my favorite creams.  It’s not a bright white, but it’s not overly yellow either! 
 
Back to the top.  I decided to go back to my original plan of staining the top and purchased a premade laminated pine panel to replace the oval. 


These pine panels are a bit rough in areas and they’re certainly a little more rustic with the knots, but I didn’t mind and thought it would add a little more character to the table.  


I found the panel to be a little longer than I wanted, so with my circular saw, I just trimmed off one side.  After some sanding and a coat of pre-stain wood conditioner, I started to apply a couple coats of chestnut colored stain.  I was a bit nervous as pine is a soft wood and stain can end up looking blotching and messy.  By applying the wood conditioner first, it helps to raise the grain in the wood which helps it to absorb the stain more evenly.  It was starting to look exactly as I’d originally envisioned.  Yay!


After the stain had set, I lightly distressed all the edges of the table base and applied a few clear coats to the entire table.  I think the soft cream color of the paint and the warm stained wood top complement each other quite well.


Not only will this table fit perfectly behind a couch to hold a lamp and a favorite book, but it could also be used in a front entrance to drop your keys and mail on the way in, or even in a guest room as a table/desk.  


This table is now available for purchase in my shop!

Thanks for stopping by!