Tuesday, March 5, 2013

Trash to Treasure


That little saying couldn’t be more true when it comes to this little dresser.  


I was told it was free for the taking if I wanted it or it was headed to the dump.  It was in rough shape -  almost all the drawer slides were falling off, it was missing a few drawer pulls, it had some paint and tape residue in some areas, and had some fairly deep scratches.

After getting it home and inspecting it, I discovered the main structure was still solid and would only require some cosmetic updates and some minor repairs on the drawer slides.  I found it a little too plain though so I decided to follow this tutorial I found on pinterest and add some decorative trim for added character.   Before I could do that, I had to move the bottom support forward to be flush with the front edge of the dresser.  After adding some wood filler to the deeper scratches and giving the entire thing a good sanding,  I added thin trim around the drawer fronts and some decorative base molding along the bottom of the dresser body. 


After caulking around all the edges and adding a coat of primer, it was already looking like a completely different dresser.


I spent about an hour fiddling with the drawer slides trying to get them to line up and ended up replacing almost all the original screws.  
 
For the top, I cut pieces of 1 x 4 lumber the same width as the dresser and using my Kreg Jig, added pocket holes along the long sides of the boards so I could join them together. 


The pocket holes are on the bottom of the boards, so once the top was screwed onto the dresser, all the pocket holes were hidden.    I trimmed it out with the same thin molding I’d used around the drawer fronts to tidy up the edges and stained it with the same rich chestnut colored stain I used on this desk.  After the stain, I finished it off with four coats of polyurethane for a beautiful glossy finish.


Because I painted the body of the dresser a soft cream, I finished it with a couple coats of my favorite non-yellowing water based polycrylic top coat.

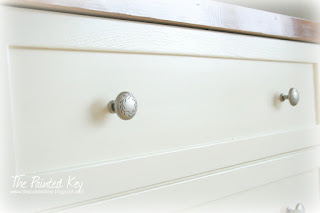
With a few of the original drawer pulls missing, I decided to fill the original holes in case I wanted to go with a single drawer pull.  Once the paint and stain was finished though, I decided to go back to two pulls.  I must have picked up at least a dozen different ones to try, but finally decided on these 1-1/4” pulls in a weathered nickel finish and a vine design etched on the front.  


And a quick before & after
 
I’m thrilled with the way this little dresser turned out.  It’s the perfect size for a small space and would also work well as a spacious bedside table.  It'll be available in my shop soon!

Thanks for popping by!

Saturday, March 2, 2013

Our New Headboard


This particular post isn’t about a refurbished piece of furniture, but an exciting DIY project I recently finished!

I have always loved the look of upholstered and button-tufted headboards!  Unfortunately, the good quality ones are just, well, expensive!  When I came across a tutorial on Pinterest for a DIY version, I immediately “pinned” it and started planning how I could make my own!  I loved the look of the side wings and the nail head trim as well!  I used the tutorial as a starting point, but ended up changing the design of the structure a bit.

We have a king size bed, so I started by ripping down a piece of 1/2" plywood to size (have I ever mentioned how much I love my circular saw?) and trimmed it out with some 1 x 3 lumber.    


I used my trusty Kreg Jig to screw together the 1 x 3 frame and then glued/nailed the frame to the plywood.  

  
I knew I wanted to add 3 rows of 9 tufted buttons, so I measured out a grid pattern and drilled ¼” holes into each intersecting line.


For the main back rest, I had originally planned to cover the plywood with 2" -3” foam.  I ended up taking apart an old crib mattress we had that we could no longer use after the plastic cover was torn.  It was made up of two dense polyester batting-type pieces that had been glued together.  I peeled them apart and laid them end to end on the plywood.They ended up working perfectly!  It was about 4” taller than I needed, but instead of trimming it, I folded it over the top of the frame to give the top of the headboard a rounded edge.  I then stapled on 2 layers of polyester batting to smooth everything out and soften the edges.


Time to add the button tufting!  Covering the buttons was not an easy task.  I’ve tried a few different button kits over the years and hadn’t had a lot of luck.  I purchased these ones at our local fabric store and they worked out to about $0.85/button.  Covering each one was tedious and took a LONG time (I was extremely picky about the fabric lying perfectly smooth around each one!), but was really happy with the way they turned out!  I did add a small amount of gorilla glue to the inside before snapping on the back covers...I wanted to make sure these buttons weren’t going to fall apart!


Starting from the center and working my way out, I attached each button by threading a piece of  nylon drapery cord through the back (using a LONG upholstery needle), added the button, and then went back through to the back of the headboard and tied a knot.   


To keep the knot from sliding through the hole, I threaded a metal washer on one cord before tying the knot.  This also helped “cinch” up the cording and prevented it from slipping when I tied the knot.   


After all the buttons were on, I pulled the fabric around the edge and stapled it to the back of the frame.

For the side “wings”, I had purchased a few 1 x 6’s and 2 x 4’s planning to build a hollow box that would give me space to add a bolt to attach the side wing to the headboard.  Unfortunately, I realized too late that once I added the foam, batting and fabric to the main back rest, the wings would barely stick out an inch from the rest of the headboard!  I was determined to stick to my budget and didn’t want to buy any new lumber, so I came up with a creative way to extend the wings.  Using my kreg jig, glue and some screws, I screwed the two 1 x 6’s together and screwed the 2 x 4 to the back!  PERFECT!   


They may not be pretty, but they’re solid and I knew once the batting and fabric was on it, it would be my little secret! (well...except now that I’ve shared it with you, I guess it’s not really a secret anymore).  

To cover the wings, I wrapped them in a layer of quilt batting to make sure everything was smooth, and then the fabric.  I had originally planned to follow the directions in the tutorial, but no matter how hard I tried, I couldn’t get the front edge to fold nicely while keeping the fabric smooth.  I ended up cutting a thin strip for the top edge and sewing it to the main panel.   


This allowed me to still wrap the fabric around the wing, but didn’t require any odd angles or bulky folds.  

We purchased the upholstery tacks off Ebay.  To keep my fingers safe, I held each tack with a pair of needle nose pliers and hammered them in with a rubber mallet so I wouldn't damage the surface of the nail. I tried a number of different methods to nail them in, but still found it next to impossible to get them perfectly lined up!  Oh well!


To attach the wings, I had purchased some special hardware called “thread inserts”.  They were supposed to be permanently screwed into the wood and have a hollow center with screw threads that would allow me to screw a bolt into it but still allow the bolt to be removed if we ever needed to disassemble the bed.  Unfortunately, the fabric and batting was getting torn to shreds when I tried to drill into it, so I gave up and ended up just using 2” wood screws.

I was so excited to finally set it up in our room!


Before and After


I’m really happy with our new headboard!  It was fun to build and I’m looking forward to making a few more changes in this room.  Since I've taken these pictures, I've already purchased new matching lamp shades and a gorgeous blue throw pillow to replace the small white one.

Thanks for stopping by!