


Hi
guys! Welcome to Day 6 of the 13 Days of
a Woodworker Christmas! I am so excited
to be participating and am thrilled to
have you stop by! This is my very first written tutorial and video share, so if
you have any questions, please let me know!
While this
particular tutorial isn’t for a Christmas specific project, it could make a
pretty awesome gift for any of the little ones in your life! At first glance it may seem like any other child’s
table and chair set, but what I think makes this one unique is that rather than
dealing with any bulky heavy drawers or table tops that have to be removed,
this table top is on full extension drawer slides and caster wheels and easily
glides out of the way to access the storage below. And because it’s supported by its own legs,
there’s no worry about little ones
tipping it over!
I’ve referred to this
as a Lego table after I built my first one a few years ago for my boys to store
their crazy amounts of Lego. But of
course, it’s certainly not limited to that! It would work so well for trains, crafts, art
supplies or spontaneous tea parties!
To make the
build as clear as possible, I’ve included instructions here, printable
instructions and cut layouts to take to your shop, AND a couple of build videos
just in case you need a little more clarification.
EDITED: Just thought I'd quickly clarify that the table base actually stays stationary while the table top slides. This allows the little ones to open the table even if it's loaded up with lots of toys that would be too heavy for them to move if it was in a drawer. :)
EDITED: Just thought I'd quickly clarify that the table base actually stays stationary while the table top slides. This allows the little ones to open the table even if it's loaded up with lots of toys that would be too heavy for them to move if it was in a drawer. :)
Let’s get
started!
Sliding
Table
Shopping
List:
1 - 4x8 – ¾”
plywood or MDF
2 – 2x2 @ 8’ - I like to use spruce or pine
Iron on Edge
Banding
Pair of full
extension drawer slides – I’m using 27” slides
Pair of
1-1/2” ridged caster wheels
Pocket hole
plugs
1-1/4”
pocket hole screws
Cut List:
Plywood:
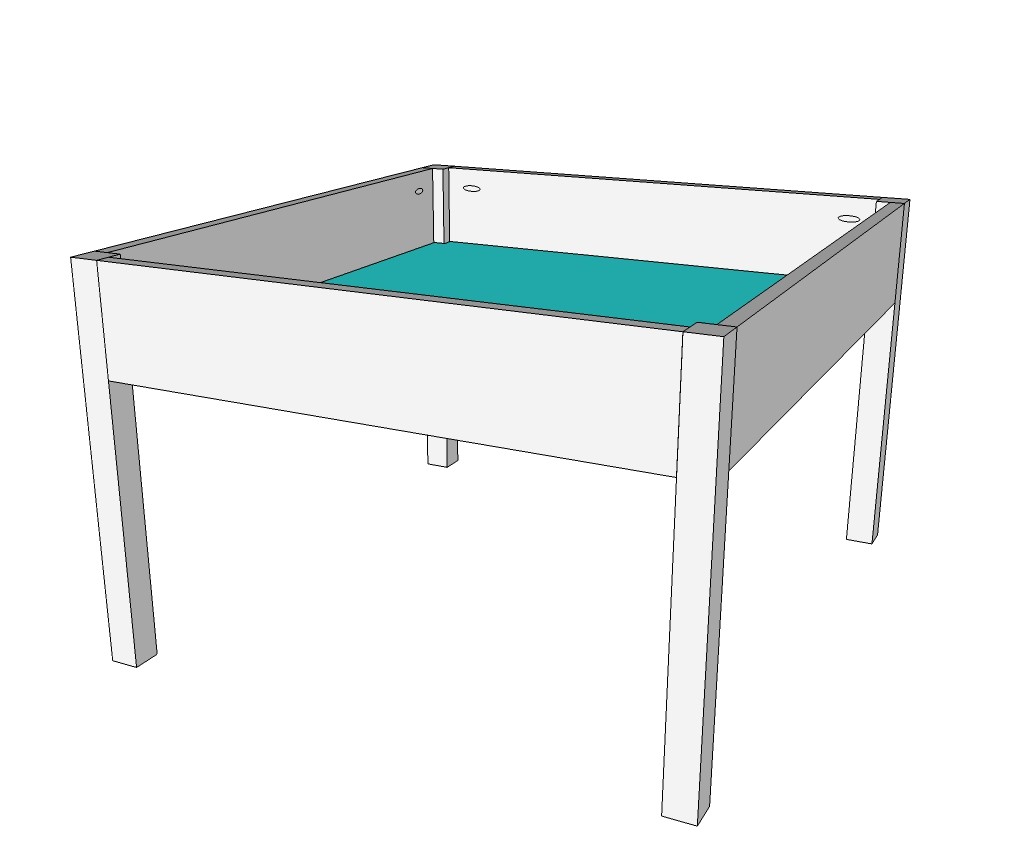
(1) 5-1/2” x 27” (Table base front)
(1) 5-1/2” x 27” (Table base back)
(2) 5-1/2” x 29-1/2” (Table base sides)
*(1) 28-1/2” x 31” (Table base bottom)*
(1) 36” x 36” (Sliding table top)
*(1) 6” x 31” (Sliding table top front)*
(2) 6” x 32-1/2” (Sliding table top sides)
(4) 2x2 @ 20” long (Table base legs)
(2) 2x2 @ 20” long (Sliding table top legs) -
These will need to be trimmed down the height of your caster wheels minus
¼”. My wheels are 1-1/2”, so I’ll cut
1-1/4” off this leg measurement for a length of 18 ¾” before adding my wheels. This allows enough clearance to prevent the
table top from hitting the base.
I’m using
¾” pocket holes and 1-1/4” pocket hole screws.
Click here to watch me build the table.
Construct
the front and back of the table by attaching the 5-1/2” x 27” plywood front and back pieces to
the 20” legs with pocket holes and screws, keeping the plywood flush with the
OUTSIDE edge of the table leg.

Attach
5-1/2” x 29-1/2” table base sides to the front and back with pocket holes and
screws also keeping them flush with the outside of the legs.

Measure the interior of the table and cut the table bottom to this size. After the bottom was cut, I laid my table upside down on it and traced out the portion of the table leg that overlapped the piece. With a jig saw, I simply cut out these corners. Drill pocket holes along each side on the underside and attach to the table.

It should be a fairly snug fit, but I chose to run a
bead of caulk around the entire joint to seal it completely. I left the
interior of the table open, but you could certainly add a few simple dividers
using any leftover plywood and few pocket holes and screws.
To start the sliding table top, first measure the
front of the table. This measurement,
plus the required clearance for the drawer slides will be used to cut the front
table top apron for the sliding top. My
table was 30” and my drawer slides each require ½” clearance, so my piece had
to be 31”. Before attaching the legs,
they will need to be trimmed down the height of your caster wheels minus
¼”. My wheels are 1-1/2”, so I’ll cut
1-1/4” off this leg measurement for a length of 18 ¾” before adding my
wheels. The total leg height WITH wheels
should be 20-1/4”. This allows enough
clearance to prevent the table top from hitting the base. Be sure to line up the plywood with the INSIDE of the table legs.
Add ¾”
pocket holes along the top to attach the table top.


Once attached, you should have just
enough clearance between the sides for your drawer slides.

Next step is the table top. I used plywood and chose to cover the raw
edges with an iron-on edge banding. If
you choose to use MDF, this step wouldn’t be necessary.

In my video I attach the top by measuring everything,
but later remembered that on the first table I built I actually just flipped the sliding top upside down and placed the table base half way inside it. I then temporarily rested the slides between the table base sides and
the sliding top sides. I held the table
top slides in place against the drawer slides and attached the top with 1-1/4” pocket screws. Doing it this way keeps everything lined up
with no measuring.

At this point I decided to prime, paint and seal the
entire table. I used Bulls Eye 123 water based
primer, Behr’s Premium Plus latex in their straight-out-of-the-can
ultra pure white in a satin finish, and topped it with Minwax Polycrylic in satin.

To attach the drawer slides to the table base, I centered the slide on
the table side, lining up the back edge of the slide with the back of the
table. Repeat on the other side.

To attach the top, measure the length of the slide and
add ¼” to that number. My drawer slides
are 27” so my measurement will be 27-1/4”
Mark that distance from the back open side of the table top towards the front and mark a line. Rest the table top on the base, using some
scrap ¼” lumber to account for the required clearance. Slide out the drawer slide, line it up with
the 27-1/4” mark and add your screws. Continue
to slowly pull the table top out to add the remaining screws.


Small Chairs
(Materials
listed are for 4 chairs)
Shopping
List:
3 – 2x2 @ 8’
1 – 1x3 @ 3’
3 – 1x2 @ 8’
1 – 1x12 @
5’
1-1/4”
pocket hole screws
Pocket hole plugs
Wood glue
Cutting List
:
8 – 2x2 @
21” long (back legs)
8 – 2x2 @
11” long (front legs
4 – 1x3 @ 8”
long (chair back rest)
4 – 1x2 @ 8”
long (chair back rest)
8 – 1x2 @ 8”
long (front and back seat supports)
16 – 1x2 @ 9”
long (side seat and leg supports)
Click here to watch me build a chair
Chair Back
Drill ¾”
pocket holes on each end of the back rest pieces. Attach all back boards to the 21” back legs
with glue and 1-1/4” pocket hole screws. I used a ¼” thick wood scrap as a spacer to offset
the back rest pieces from the top and front edge of the legs. Keep the pocket holes on the backrest pieces
facing the back of the chair. I chose to fill these pocket holes using
Kregs paint grade wood plugs as I knew I was going to paint the chair. I glued the plugs in place and cut off the
protruding portion once the glue was dry so it was flush with the back of the
chair.

The bottom
seat support should have the pocket holes facing forward so they will be hidden
by the seat.

Chair Front
Join the
front 11” legs with the 8” 1x2 using glue and 1-1/4” pocket hole screws. I used my ¼” scrap lumber again to offset the
piece from the front of the legs.

Join the front
and back of the chair with the 9” 1x2 side aprons and bottom supports with glue
and pocket hole screws.

Seat
Mark 1-1/2”
from the top and each side of the seat and cut out each corner to accommodate
the back chair legs. I used my band saw, but a jig saw or small
hand saw would also work.

Before
attaching the seat, I chose to paint the chair and stain the seat for some
contrast. Like the table, I primed,
painted & sealed. For the seat, I
stained in Minwax Jacobean and sealed it with Minwax Wipe on Poly in a satin
finish.
Attach the
seat to chair from the underside with small corner brackets and 5/8” screws.


Done! Only 3 more to go.

Now, about that giveaway!
We've teamed up
with @RyobiPowerTools and @PaintWIZ_ Paint Sprayers to bring you a prize pack
valued at over $300! Have you seen Ryobi's new One+ 18v
Brushless Hammer Drill/Driver Kit in stores yet? I bet you haven't because these
haven't even hit the shelves yet. How about Fuji Spray's DIY turbine paint sprayer called the PaintWIZ? We've got that too! US and
Canadian residents only please*
To enter to win the giveaway, repost
the 13 Days of Woodworker Christmas Image to your Instagram feed with the tag
#13DaysofWoodworking. Want additional entries? Each day a different
blogger "unwraps" their project they'll post a teaser image on their
Instagram feed. Follow their account (and check out their project!) and
repost their teaser image to your Instagram feed with the same tag
#13DaysofWoodworking along with the unique tag that's will be given out along
with each project. We are giving you 14 different chances to
win this awesome gift pack! You have until 10:00pm PST on December 14th to
enter. All entries will be tallied and a winner will be announced Friday, December
16th.
My "unique tag" for the extra bonus entry specific to my project is #legochristmas
Good luck and thanks again for stopping by!!
Cristina

It's a great article. I'm a DIY lover. I wanna make it with my woodworking tool. thanks
ReplyDelete