Monday, May 7, 2012

The "not so real" Wood Cabinet


 Before & After


When I came across this cabinet on a local online sale site, I wasn't too sure what to think of it.  It was in rough shape and I was quite sure it was a laminate piece, but listed at only $10, I thought I could afford to take a chance on it.  I emailed the owner and was told numerous times it was in fact solid wood. 

These are the pictures that I "borrowed" from the online ad.


Hum...looking at the picture and the detail of the "wood grain", I still suspected it WAS laminate, but, hoping I was wrong, I went to see it.  A closer look confirmed my suspicions.  It was definitely laminate.  I'd never painted laminate before, but I'd read up on it and it seemed to work, so I thought I'd give it a try.

The current paint job on it was bad.  I could tell that no primer had been used on it.  Not good.  Laminate tends to be a very shiny finish and so without a primer, the paint was literally peeling off.   


I thought it would be easy to sand off the old paint, add a layer of primer, and I'd be set to paint.  Perfect - a project I'd have finished in no time!  I started sanding...and sanding...and kept sanding.  After an hour of getting nowhere, I decided to attempt another route.  I grabbed a razor blade and thought I'd try peeling the paint off.  It worked, but it was slow and far from enjoyable.  My hands and arms were cramping up from holding the blade.  After hours of scrapping, I finally decided to sand off the small pieces of paint remaining and told myself it was good enough!

Originally I believe the shelves in the right swing out door were for dvds and cds.  The top shelf was too high for dvds and would have been wasted space as I planned to only store my kids dvds in it.  I took the door apart, removed the top shelf and then moved the 2nd shelf up.  It was a bit of work, but worth it knowing I'd be able to use all the shelves now. 

I rolled on two coat of my favorite primer and then sprayed on a few coats of white satin paint.  I finished it off with a couple coats of Minwax Polyacrylic to protect it.

One thing I knew I wanted to try on this cabinet was the use of chicken wire.  I've seen it added to a lot of furniture lately and love the look.  At first I thought it would be easy to remove the existing glass.  Unfortunately, I guess the door was built around the glass instead of the glass added afterwards.  Unless I physically took the door apart (knowing that it could very well end up being completely destroyed in the process), I had to come up with another way to "remove" the glass.  I laid it down on a few sheets of newspaper and put a few more sheets on top of it.  I grabbed my hammer and...it wouldn't break!  WHAT???  I was hitting glass with a metal hammer and it wasn't breaking???  So, what did I do next?  I took a large framing nail, put on a pair of thick leather work gloves, and attempted to hammer the nail into the glass.  Well, it worked that time! It completely shattered into a million pieces.  I'd forgotten that's what safety glass does.  Because I had it lying on the newspaper, it was quick and easy to clean up.

I used my nail/staple gun and my air compressor to staple the chicken wire to the back of the door.  Using pliers, I curled under all the cut edges hoping that will be enough to keep fingers safe.  It's certainly nothing pretty to look at and I may add some sort of wood trim around it in the future to pretty it up a bit, but for now it works.

I decided to use the existing hardware that had come with the cabinet.  It's modern and I liked how it matched the chicken wire.  I may add an additional shelf at some point, but for now it's in our living room being used as our new media cabinet.  Love it. :)


Just a note:  While I am extremely happy with the way this piece turned out, laminate wouldn't be my first choice when it comes to painting.  Even with a good primer, painted laminate does have a tendency to scratch easily. Of course, if I had any other laminate pieces that I was tired of or felt could be freshened up with paint, I wouldn't hesitate to paint them!


Tuesday, April 24, 2012

Pretty as a Peacock

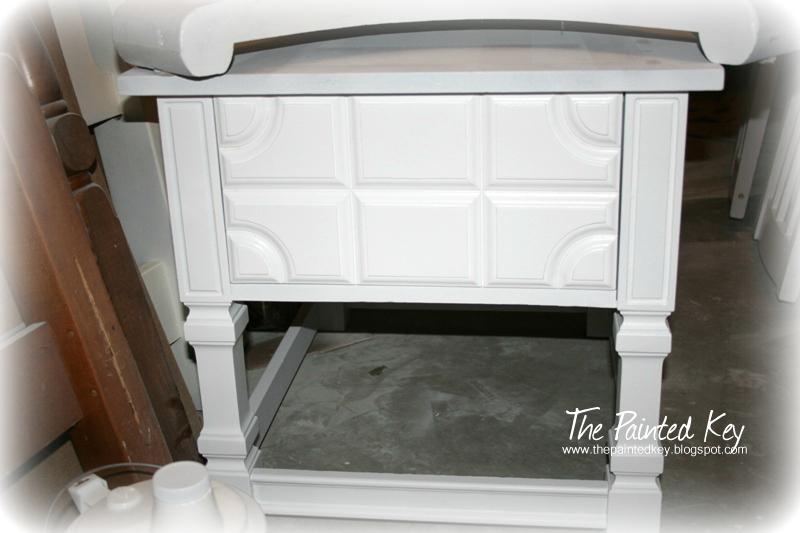
When I came across this little side table sitting outside my parents garage and was told it was headed to the burn pile, I snatched it up and brought it home with me.  


It was definitely looking a bit rough, but I thought there was no harm in trying to bring back its original beauty.  I knew I had my work cut out for me though.

To start, the front of the drawer was dented, scratched and the original hardware (which was now missing)  must have been rubbing on it because it had worn a large divot in one of the panels!  Poor little table. 


Unfortunately the outdoor weather hadn’t been kind to the table top causing some water damage to the surface.

The first thing that caught my eye though was the chunky legs.   I absolutely loved the square detail on them!  Even though I wasn’t quite sure what the outcome would be, I knew I had to try some paint magic with this piece.

I started by filling in the original holes for the hardware,  large dents and other damage with some wood filler.  After a good sanding, I applied a coat of my favorite primer.  After that I sprayed on a few coats of white paint.   


 I thought it looked fine, but it ended up sitting in our garage for a few months after that point.  For some reason it just didn’t feel “finished” to me.

About a month ago, I had this crazy idea to try something bold...I wanted to try painting with color!  Now, if you know me, you’ll know I pretty much always stick to white. White works...it’s a “safe” color.   Ok, so I’ve tried a few different cream colored paints, but that’s about as extreme as I go.  This time I wanted something completely different!  Before I could change my mind, I went and bought a can of “Peacock Tail” blue paint.


The first few coats I sprayed on were a bit shocking!  At first I wasn’t sure if I loved it...or if I had completely lost my mind!  Eek!  After at least 4 coats of paint and drilling new holes for the hardware, I was happy with it and so  I set it aside to “cure” for about a week.  


What I quickly discovered was the dark paint was really bringing out all the imperfections.  Remember the water damage on the top?  Unfortunately, I wasn’t able to sand it down to a completely flat surface.  The white paint seemed to camouflage that, but the dark blue, well, not so much.  Rather than try to fight it though, I decided to go with it.  I took my mouse sander and “distressed” all the corners and edges.  I loved how the white paint was showing though!  


After a few coats of wipe-on polyurethane, I added some vintage hardware and it was finished!  


I just love dovetail drawers!


 Sure, it’s not perfect, it’s got its lumps and bumps here and there, but it’s all part of the Cinderella story this little table has to tell.  I’m thrilled I was able to “rescue” it and hope it can once again be enjoyed in someone’s home.

Here's another before & after.  Such a transformation, don't you think?


I'll be adding this side table to my shop shortly!

Thanks for stopping by!

Cristina

Sunday, April 8, 2012

Basic Black

Just a short post regarding another project I finished yesterday afternoon.  I picked up this small pine table a few weeks ago for a decent price.  Nothing spectacular, but it was sturdy and in decent shape.  It had previously been painted white and someone had even taken the time to paint a checkerboard in the middle of it!  Perfect for a games room!

Here's the pic from the online ad.  Oh, and in case you're wondering, no, the toys and wires on the floor were not included in the deal. ;) 


My husband had asked me to keep my eyes open for a small table for him to have in his "man cave" and I thought this one would be perfect...after a paint job.

I have it a light sand and gave the entire piece a coat of primer.

At first I was hesitant to paint over the checker board, but hubby had no need for it, so it had to go.


After a couple coats of black paint and a clear coat, it's finished!


The table is a very simple design and with its basic straight leg, painting it was easy.  It will now fit in with the other pieces of furniture in the basement.

Thanks for stopping by!

Cristina

Sunday, March 25, 2012

A Pretty Pair

I recently finished this pair of bedside tables for a friend who contacted me asking if I had a set of side tables in my current furniture stash.  I was happy to say I did! 

These tables originally had a set of heavy doors on them.  


One of the doors was missing its hardware, but I found the doors dated the piece so I decided they had to go.  They were also covered in cobwebs, ink marks and water rings - highly unattractive! BUT, I wasn't about to complain.  Why you may ask?  Would you believe I actually found them sitting in someones front yard with a "Free" sign on them?  Of course I had to take a chance on them.

It was QUITE the ordeal for me to get them home though.  I still laugh and shake my head when I think about it.  I had all three of my kids AND my double stroller in the van...so what did I do?  I squished one in the back beside the stroller...and the other sat on my passenger front seat!  I received QUITE a few strange looks on the drive home. ;)

I had previously painted one of the tables and had it in our guest room but it was just a little too large for the room and so I never got around to actually finishing it.  All it needed was a light sand and a fresh coat of paint.  The second table was still sitting in my garage patiently waiting for its turn to be refinished.  

Unfortunately, I forgot to take pictures as I was redoing them!  I filled in the holes with some wood putty, sanded everything down and brushed on a coat of my favorite primer.  Once dry, I sprayed on a few coats of white paint.  I’ve painted a lot of furniture, but I am still always amazed with every single piece at what a difference a coat of paint can make.  I did have to dig out my paint brush and roller to paint the interior of the cabinet just because my paint sprayer was too bulky and I couldn't reach the back.

Once the paint was finished, I applied a few coats of Minwax Polyacrylic in a semi-gloss finish.  I love this clear coat because it’s water based (soap & water clean up!) and it won’t yellow overtime which is a definite plus when painting white or light colored pieces!


This refinish took a bit more work and a lot longer than I anticipated but I'm happy with how they turned out and I hope they will work well in their new home. :)

Here’s one last before and after.  Such a change! 


 Thanks for stopping by!

Sunday, February 19, 2012

8 Drawer Dresser


I came across an ad for this dresser online and noticed that it had already received a huge number of “page views”.  Although the picture wasn’t ideal, the price seemed decent, so I assumed the dresser was probably long gone and the owner just hadn’t removed the ad yet.  I always like to send a quick email “just in case” and was thrilled to receive a response informing me that yes, the dresser was actually still for sale.

This is the picture from the online ad:

 
From what I could tell, it just looked like it was in desperate need of a good sanding, a coat of primer and a few coats of paint.  Sounds simple enough, right?

When I arrived to look at the dresser, I noticed one bottom edge seemed to have some water damage.  It didn’t look too bad, so I “thought” some glue, a few clamps and a good sanding would fix that up. 

When I got it home, I removed the drawers and sanded down the main body of the dresser.  


Once finished, I was able to inspect the side a little more closely.  Oh boy...I realized the side was made from a piece of plywood and the water had actually separated many of the layers and was damaged over halfway up the side.  There would be no gluing or clamping...the entire piece would have to be replaced.   SO, what did I do?   


 Ok, maybe not.  I certainly wasn’t smiling as I took a hammer to it and smashed out the side though!


With the cause of my aggression now lying in splinters on the floor, I started sanding the drawers.  I realized almost right away there was a problem.  See the light color peeking through under the light green?


 The light green paint was obviously a latex...the light color underneath must have been an oil.  If you are not familiar with painting, keep note that this is a HUGE no-no!  Latex paint will NOT stick to an oil paint.  (latex is fine over an oil base PRIMER, but NOT an oil base PAINT)   It was no wonder the paint job was in such bad shape...the slightest bump and it was peeling off! 

I think it was at this point I sat down on my garage floor and just stared at it wondering WHAT in the world I’d gotten myself into!  Kicking it to the curb crossed my mind, but a friend had seen the before picture I’d posted on facebook and had already asked if she could buy it when I finished it!  I knew I had to keep pushing onward!!!

I lost track of how much time I actually spent sanding the dresser...it was a long time, I know that.  I was SOOO excited to finally apply that first coat of primer!  


You may have noticed the far side of the dresser is still missing.  I needed my hubby to cut a new piece for me, but was too impatient to wait until that happened, so I kept going forward without it!

After the primer came the paint!  


It was so nice to see a beautiful piece of furniture finally emerge after all the problems!

With a new piece cut, primed and painted, you would never know I had smashed out this side with a hammer!


I had originally planned to reuse the original drawer pulls assuming they were just painted wooden pulls.  They weren’t.   They were a cherry red plastic which had been poorly painted with the same dark green latex paint.  Latex paint over plastic – also a no-no.  I ended up just buying some brand new simple white pulls to replace the original ones.

After a couple of clear protective coats, the dresser was finished!  SUCH a transformation, don’t you think?    


Now that this project is complete, I can actually sit back and laugh about the entire thing.  It was definitely a LOT of work, but I’m happy with the finished piece.
 

Monday, January 9, 2012

Bedside Beauty

Well, that was a slightly longer break than I anticipated.  While I am extremely fortunate to have a large garage to work in, it’s not insulated, so as soon as the cold weather hits, a lot of my furniture redos have to be put on hold.   Cold weather + cold paint = NOT good.   I think the break was good for me though – I needed to step back and take bit of a breather.  Of course, with the beginning of the New Year, I was chomping at the bit to get back outside and start working on these pieces that have been sitting and waiting for me.

One of the pieces I finally finished was actually “mostly” completed a few months ago.  This bedside table was one of a few pieces I purchased from my brother-in-law last summer.


 It was in decent shape, but the orangey wood tone was just dated.  And the hardware definitely had to go.  In “blog-land”, this particular hardware is referred to as “flying bats”.  Ha ha.

I decided to go with a painted base and stained top.  I started by stripping the finish off the top and giving the rest of the piece a light sand and a coat of primer.


After taping off the top, I chose to spray the base with a soft cream colored paint instead of my usual white. I knew I wanted to go with a warmer colored stain and I thought the cream paint would compliment it better.   


 After 3 coats of paint, it was time to start the stain.  I had been debating whether to go light or dark and finally decided on a warm chestnut color.  I was really happy with the way it turned out!


After that was done, the cabinet sat...in the garage...for about 2 months. ;)   I never seemed to get around to picking up new hardware for it (to replace the “bats”) I FINALLY made a special trip into town this past weekend specifically for it.  Fortunately my trip was successful and it actually didn’t take that long to choose!


Although it now looks finished, it’s actually ALMOST done.  I still need to add one more coat of wipe-on poly to the top and then brush on a few coats of poly acrylic on the base.  THEN it will be complete.

Here’s one last quick side-by-side before and after!


Ahhhh....so much better.

I will be listing this piece shortly, so if you’re interested in it, please let me know.

Thanks for stopping by!

Cristina

Sunday, October 23, 2011

China Cabinet Craziness

Wow, can't believe it's already been a month since my last post and yet I don't really have much to show for it.  I've got a number of projects on the go, but none of them are quite ready to be revealed...hopefully soon!

I did manage to ALMOST finish a project that I started a few months ago but now it's even closer to being done!  Ha ha.  Does that even make any sense????

A few months ago I came across an online ad for an “Apartment size China Cabinet”.   There was no picture and very few details, but it was local, so I thought I would go see it.    It was bad.  I couldn’t seem to look past the horrible dark brown color, the cobwebs & the dust.  (It was being stored in the owners garage and covered in paint cans and car oil containers).  I actually decided to pass on it and went home empty-handed.   

A week later, I couldn’t get this cabinet off my mind, so I emailed the owner to see if it was still available – it was.  It was just as horrible as I’d remembered, but I managed to get the price down a bit, so I decided to take a chance.

Here it is in its ugly state on our front deck.   


My husband helped me unload it from the van, glanced at it and then gave me “the look”.  Yup, that “why did you buy this ugly piece of crap” look.  I’ve seen it many times. ;)

The original hardware was definitely not helping!


What I did like was the storage though.


I started on it right away by giving it a light sand and a coat of my favourite primer...Zinnser Cover Stain.    It covers everything!!!  I realize now I actually forgot to take a picture of that step.  Oops.  After that, I covered the entire piece in a coat of white satin paint.  Ahhhh...so much better.  I felt it still needed a little something, so I added some crownmolding to the top to give it a little more height and add a little bit of a decorative element.  This was my first attempt with crownmolding and, well, let’s just say wood filler and I have become good friends.


After giving it a 2nd & 3rd coat of white, I added a clear coat and moved it into our living room for our electronics and a few higher shelves for me to decorate that would be out of reach of little fingers..  It sat like this for 2 months until I finally finished painting the doors this week to add to the bottom.  The doors had a, um, “unique” block design on them.  Shall we look again?


I hated it.  The inside was very simple and I much preferred that look, so I turned then “inside out” instead.   I would still like to add some beadboard to the front panels to dress them up a little more, but that will be at a later date.

I decided to keep the original drawer pulls as I found them to be a little unique and don't mind the way they look now against the white paint.  I added some glass antiques knobs I had on hand for the doors though and for now, I’m happy with the way it looks.


It’s the perfect spot to tuck away our kids dvds and the extra blankets we like to curl up under when we watch a movie.

So much better now, isn't it?  Thanks for stopping by!

Cristina