Thursday, August 23, 2012

French Provincial Side Table


I picked up this cute little side table a few months ago.  The picture in the ad didn’t look too bad and the price was decent, so I thought I’d take a look.  


It definitely needed some TLC.  The current finish was a bit rough and while you can't see it in the picture, it had some serious water damage along the top. 

After a LOT of sanding, a few coats of wood filler and then even more sanding, I sprayed on a coat of primer.  I quickly realized that the top was going to still need some more attention.  I forgot to take pictures, but lets just say that the previous wounds I thought I’d taken care of decided to stay visible!  More sanding and wood filler would be required!

After the primer was finally finished, it was time to paint.  At first I thought I would go with my predictable white.  It would be simple, clean, and white seems to sell quickly.  BUT, I couldn’t do it.  I was craving color again!  I had some leftover light turquoise paint from my coffee table project and thought I’d give that a try.   


I liked it, but wanted to take it a step further and give it some depth, so I decided to lightly glaze it with a custom mix chocolate color glaze.  I loved it!

 
I knew I wanted the top a different color.  Because the top was not solid wood, staining it wasn’t an option, so instead I painted it a beautiful rich espresso brown


I felt the existing hardware suited the piece, so I just updated it with a fresh coat of Oil Rubbed Bronze paint.

 
I’m happy with the way this piece turned out.


This piece has already been sold!

Thanks for stopping by!


Wednesday, August 22, 2012

7-Drawer Dresser


I actually forgot to take an official “before” photo, so I’m using the one from the original online ad.  This particular dresser was in decent shape.  

I’m sure there are many stories behind all the nicks, dents and scratches, so I chose to leave them so they would show up in the finished piece.  After sanding, priming and painting, I lightly distressed all the edges and then sprayed on a glossy protective clear coat.


I wrapped the drawers before painting to keep the interiors tidy.  I prefer to leave the interiors unpainted as I find the paint tends to rub off if they are painted.


I had planned to replace the hardware, but quickly discovered that all new hardware is now made 3” on center.  That means 3” from the center of one hole to the center of the other one.  Unfortunately, the hardware on the dresser is vintage and is 2-7/8” on center!  Eek!  Replacing the hardware meant I would have had to fill all the old holes and then re sand, prime and paint the drawer fronts all over again!  NOT an option.  Instead I decided to update the existing hardware with paint – and I am SO glad I did.  I absolutely love it and feel they are perfect with the style of the dresser.


This piece is now available for sale!

Thanks for stopping by!


Saturday, July 14, 2012

Terrific Twin


With my last post being “twin” related, I thought I’d share another “twin” project.  Another friend of mine was redoing her spare room and asked if I had any twin size bed frames in my collection of furniture.  I had a couple to choose from and she chose an adorable maple frame.

The bed was actually in decent shape.  The finish was in great condition and the foot board just needed a little glue to tighten it up.  This is the picture from the online ad.


After a light sand and some primer, and at her request, I sprayed on a few coats of crisp white.  The clear coats after that gave it a nice glossy shine! 


I love the detail on the posts!


I can’t wait to see it all dressed up in its new home!  

While painting the bed, I also refinished  a dresser for her but completely forgot to take “after” pics!  I’m hoping she’ll send me pictures of the completed room!

Thanks for stopping by!


Thursday, July 12, 2012

"Almost" Identical Twins


Over the past few weeks I’ve kept myself quite busy painting in the garage!  After the grey buffet, I worked on a pair of (almost) identical adorable little French Provincial bedside tables.  I bought the two tables (and a matching desk) about 2 years ago when I first started painting.  This is pretty much what they both looked like when I got them home:


Poor things had certainly seen better days!  At the time, I only finished one table and didn’t realize I needed to add a protective coat after the paint.  

  
Unfortunately, time (and kids!) were a little hard on it and it needed to be freshened up again.   When a friend asked if I had a pair of tables available, I knew it was time to start over on the side tables.

With a good sanding and a fresh coat of primer (I wanted to make sure I started from square one!) I gave both a few coats of crisp white followed by a few clear coats.  I sprayed the original hardware with a soft buttery color for a light contrast.


At first glance you may think they're identical, but when you look a little closer, one is actually a bit taller and the drawers sit a little differently.


The tables were designed to look like they have three drawers, but actually the bottom two are one deep drawer.


I’m really happy with the way they turned out and hope they’ll work out well in their new home.


Thanks for visiting!
 Cristina

Thursday, June 28, 2012

Going Grey


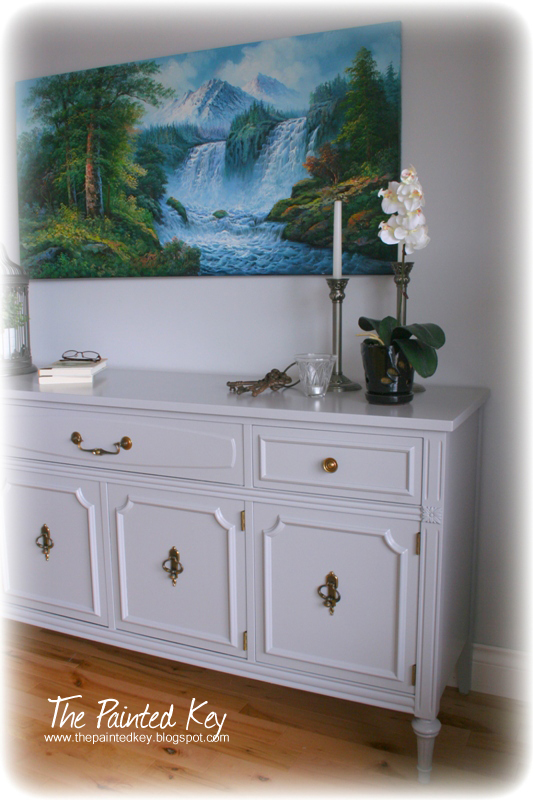
I picked up this beautiful buffet after dropping off my oldest son at piano lessons one afternoon.  I loved the shape of the hardware and details on the legs!  Other than some deep scratches along the top and a a chunk missing from the back edge, it seemed to be in decent condition.
 

No missing hardware!


Ouch - hopefully nothing some wood filler can't fix!
 

Plenty of storage space!


Rather than go with my usual white paint, I chose what I thought looked like a dark grey - "Pewter Mug" by Behr.  It ended up being lighter than I thought.  Oops.

I chose to leave the inside of the drawers and interior of the cabinet unpainted, so wrapped them and sealed off the inside with tape and newspaper to keep the paint out.  Once painted, I finished it with a few glossy clear coats.


I love how shiny the clear coat is!


I didn't touch the orignal hardware.  I think the shape is perfect for this piece.


And I still think those legs are whistle-worthy! *wink*

I'm not sure if I'm quite ready to list this piece!  I'm still trying to convince my hubby that it would look perfect in our living room with a flat screen hanging above it!  I guess I'll just have to wait and see.


Thanks for stopping by!

Cristina


Thursday, June 14, 2012

Retro Rescue


Before & After


I purchased this dresser last year and had it sitting in my office for MONTHS.  
  

It was in decent shape, but had a few deep scratches and nicks along the top.   


The original hardware had certainly seen better days and I knew it would need to be replaced.  


For this makeover, I decided to remove the wooden handles along the bottom two drawers as I felt they dated the piece a little too much.   They were simple to remove, only being held on with a couple small screws.  I filled the holes, give the entire piece a good sanding and a couple coats of primer.   

A friend asked if I would refinish it for her the same way I had refinished a recent set of bedside tables she had purchased from me.  A couple coats of white satin paint and a few glossy clear coats later, I loved the way it looked!   


With the addition of the new satin nickel drawer pulls, I think this little retro dresser fits right in to any modern home now.   


 And really, who can resist those cute little pencil legs now!


Thanks for stopping by!

Cristina