Friday, July 19, 2013

Table x Two


These solid little side tables were part of the same furniture package that included this sofa table I refinished.   


A friend had asked me if I had any matching side tables in my furniture stash and so I set these aside to work on when I had time.  Eight months later (ack!) I finally dug them out!  She had already expressed interest in the desk and hutch I just finished and asked if I could refinish the side tables to match.  I started by stripping the tops .  I don’t know what sort of finish was on them, but whatever it was definitely took a LONG time to get off!   


After chemical stripper AND sanding, it still left a slight sheen in spots…of course, these only showed up after I started to apply the first coat of stain!  Out came the sandpaper again.  I think it happened twice?  Anyway, after 3 coats of stain (not including the previous coats before I had to sand it off again!) I finished it with 5 coats of poly. 

The base of each table was primed, sprayed in a crisp white satin and clear coated.   Once again I'm lovin' the curvy legs!


The drawers were painted to match the recent desk makeover, sprayed in a beautiful blue/green satin and clear coated.  


Even though I’ve had my paint sprayer for almost 2 years, I’m still learning new little tricks with it.  I am beyond thrilled with how smooth and glassy the drawers turned out!


I lined the dovetail drawers with the same  black and white vinyl I used in the desk.


The original drawer hardware was not only ugly and dated but the screws had been completely stripped, were bent and lodged so tightly in the drawer pull that the only way I could get them off was to actually ask my dad to take a metal grinder to them.   

 
I knew I wasn’t going to be reusing the hardware, so I didn’t care if they were damaged.   When it came to new hardware, I made the mistake of only measuring one of the side tables.  A lot of old furniture hardware is 2-7/8” on center…pretty much all new hardware is 3” on center.  The table I measured was the 2-7/8”.  They’re older tables, so I wasn’t surprised and ordered two new drawer pulls - at 2-7/8” -  from Lee Valley Tools.  A week later my order arrived and I couldn’t wait to see what the hardware looked like against the drawer color!  The first one went on perfectly.  When it came to the second table, I realized immediately I had a problem!  The spacing was wrong!!!  I grabbed my tape measure and sure enough – the holes were 3” on center!  ACK!  Looking at the “before” picture now, I can definitely see the difference, but at the time I didn’t even take a second glance at it!    

I had two choices – I could attempt to find new hardware that came in both sizes…or fill in the holes and redo the entire drawer from scratch (sanding, priming, painting, clear coat).  I tried to find new hardware, but nothing even came close to the hardware I’d ordered.  It was too late – I’d already fallen in love with it and nothing.else.would.do.  SO,  I filled in the holes and started over on the drawer.  While frustrating, it was all forgotten when I saw both tables with their gorgeous new hardware.  


And another before & after:


I hope these tables will work well in their new home! 

Thanks for popping by!
 

Sunday, June 30, 2013

A Quick Hello!

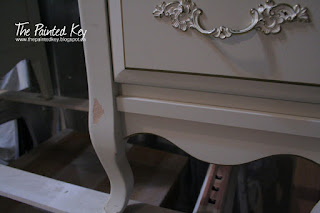
Just popping by to say hi!  I've been working on a pair of side tables that will match the desk and hutch I recently refinished and hope to have them finished this week (and that's a BIG "I hope"  Here's a quick sneak peek "before" pic of one!


So why have I sort of disappeared over the past two weeks?  Well, I've actually taken on my biggest project EVER.  I'm helping renovate my sister and brother-in-laws townhouse!  We're two weeks in and starting to see a sliver of light at the end of the tunnel!  We've obviously still got a ways to go and I'm spending as much of my free time on that as I can, so I don't have much to post here at the moment.  I promise to post all details and amazing before and afters when it's all finished! :)

Here's a quick peek at what has been happening (and proof as to why you do NOT paint latex over oil paint - something I guess the previous owner wasn't aware of).  


EEK! Lots of scraping and prep work before the "pretty" can start to happen.


Thanks for stopping by!


Tuesday, June 11, 2013

French Provincial 6 Drawer Dresser


I picked up this little 6 drawer dresser a couple years ago, slapped on a coat of white paint and stuck it in my daughters room.  Here's a pic from the original online ad with its gold accents and covered in paint splatters and cobwebs.

My daughter was in desperate need of some storage space and so I didn’t bother finishing the dresser.  Like the little desk I recently refinished, it was certainly showing some wear.  Although I hadn’t planned to sell the dresser, I decided to refinish it after receiving a message from someone asking if I had a dresser she could buy from me.   (I have another one already lined up so my daughter won’t go without her storage space! ;)        

After wrapping each drawer and taping off the inside of the dresser (a lot of work, but something I've started to take the time to do!) I sanded the dresser down and resprayed it in a crisp white.  After some light distressing, I finished it with a glossy clear coat.


Crazy as it sounds, unwrapping freshing painted pieces feels like Christmas morning to me!

The original hardware got a fresh update in glossy white as well.

Again with the curvy legs! LOVE them!


I decided to line each of the drawers in the same black and white vinyl as my last desk makeover.  I feel it finishes off the drawers perfectly.


I hope this little dresser will work well in its new home.


Thanks for popping by!


Saturday, June 8, 2013

Sugar and Spice


It’s another desk makeover!  This is the last desk for awhile...at least, I don’t think I have another one buried in my garage right now.

I picked up this cutie last summer and finally dragged it into my garage to work on it. I forgot to take a full before pic, so I contacted the seller I’d purchased it from and she gave me permission to use the original picture she’d sent me.  


It was solid, but needed a bit of a face lift.   


The paint along the top had started to lift and chip away so I decided to spend the time stripping it down with the intention to stain it.  I just love the look of a two-tone piece!  


After spending a fair amount of time stripping away all the paint, I was disappointed to find the wood had some serious discoloration.   


I’m not sure if it had been painted over that way, or if something had somehow gotten under the paint.  After some serious sanding, I was happy to find it was just surface staining and I could continue with my idea of staining it.  I chose to use my favorite chestnut color, English Chestnut by Minwax.  I love the rich deep color.    

First coat
 

Second coat

 After two coats of stain, I finished it with five coats of glossy polyurethane.  

To update the look of the hutch, I chose to remove the two doors.  I found the design slightly odd with the open shelf above them.   


Both the hutch and the body of the desk received coats of primer, crisp white paint and were followed with a glossy clear coat.

I decided I wanted to try something different than my usual “paint everything white” treatment like so many of my furniture pieces usually do.  My inspiration was this gorgeous buffet refinished by Marian, aka Miss Mustard Seed.   


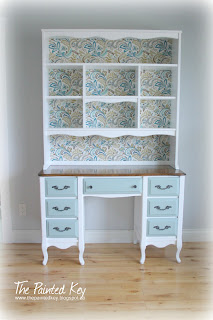
I chose to paint the desk drawers in the same soft blue/green color I used on this little desk chair makeover.  The original hardware was updated with oil rubbed bronze paint.


I'm such a sucker for furniture with curvy little legs!!!


I thought it was only fair to freshen up the inside of the drawers as well with a simple black and white vinyl.


I left the very back of the hutch until last.  I debated whether to just paint it white, the same blue/green as the drawers, or to go with something completely different and add some colorful fabric.  The fabric choice won.  I had this beautiful piece in my fabric stash and it worked perfectly with the painted drawers.   


I cut a new ¼” plywood backing and adhered the fabric.  Once the edges were trimmed, it was attached to the back of the hutch.


I am absolutely thrilled with the way this makeover turned out.  I knew I was taking a chance straying from my usual solid white paint, but I felt this desk could handle it.  I love the way the fabric picks up on the white and blue/green paint colors as well as the glossy wood top.


This beauty will soon available in my shop and ready for a new home.

Thanks for stopping by!